How to install Minecraft Mods & Resource Packs?
Minecraft is a game that has something for every type of player; there are tons and tons of blocks to choose from for the builders out there, there is an immersive story that keeps some going, there also is an excellent world generation for those like to explore, the game doesn't disappoint any player, and that’s the beauty of it.
The vanilla game is something that many like and adore. But if you play vanilla for a while, you start to get bored, even though Minecraft is a game with immense replayable value, seeing the same old mobs every day, fighting the same bosses, again and again, get’s tiresome and frankly very bland after a point. I have defeated the ender dragon hundreds of times, and I don’t feel any excitement about reaching the end anymore.
Thankfully the folks at Minecraft allow the community to create amazing mods that spice up the game and, in some cases, totally change the look and feel of the game. Mods add so much stuff to the game that it is hard to believe that average players who like Minecraft dedicate hours and hours to create such great mods.
The same can be said for the resource packs that Minecraft has, there are literally thousands, and thousands of resource packs out there, and you’ll always find something that suits your own style.
Learning how to install these great mods and resource packs can open doors for you that you didn’t know existed before in Minecraft. There is a whole new world waiting for you to be explored, so why not learn how to install these mods and resource packs and get on with it!
In this blog post, we’ve put together the most in-depth and easy guide to follow if you want to install resource packs or mods in Minecraft. In this blog post, we’ll guide you through every step, and by the end of it, you’ll be well-versed in downloading, installing, and uninstalling mods and resource packs in Minecraft!
So without any further ado, let’s get right into it!
How to install resource packs
Before installing these resource packs, let me make something obvious. Resource packs are also called texture packs in many Minecraft groups, so don’t get confused between the two terms; they are the same thing. The only reason for the confusion is that some players like to use them interchangeably, but they are the same thing.
Downloading and installing resource packs can’t be any easier than it is right in the game. Minecraft has made significant improvements to the UI, which allows the player to install new resource packs on a who without worrying about locating the file locations and all the other tedious stuff that some games have.
Before installing or even downloading the resource packs, make sure you choose a resource pack or texture pack that is suited for the version of the game that you are on. When writing this blog, the 1.18 update is out and likely will be the update that you have on your game right now, but if you’re reading this in the future and have the 1.19 update make sure you install resource packs for that version of the game.
As for the 1.18 update, the resource packs work just fine if you pick the right version. But for 1.18, you can also use the 1.17 update resource packs as the 1.18 update didn’t change any textures in the game that are very significant and game-changing, so you’re good to install and play with resource packs from 1.17 as well!
Download
Different Miecraft resource packs can be downloaded from other websites; you can choose any resource packs and search for them on the internet. The resource pack might have its own dedicated site, or most probably, it’ll be on a site that aggregates a lot of different resource packs like resourcepack.net or thebreakdown.net.
Unlike mods which are a little more complicated to install, resource packs or texture packs can be installed very quickly once you have a legitimate file. Make sure you download the source file for the texture pack from a decent site, or you might end up downloading some malware on your PC, which is the last thing we want.
Once you’ve successfully downloaded the resource packs you wanted to install in your game, head on to the next step. We will show you to install the resource packs for your Minecraft version.
Installing
Once you’ve downloaded the necessary resource packs, you’ll have to locate them. They will probably be found in the downloads section of your PC unless you’ve stored them somewhere else while downloading. Regardless of the location, drag and drop the resource oaks onto your desktop main screen where you can see them clearly.
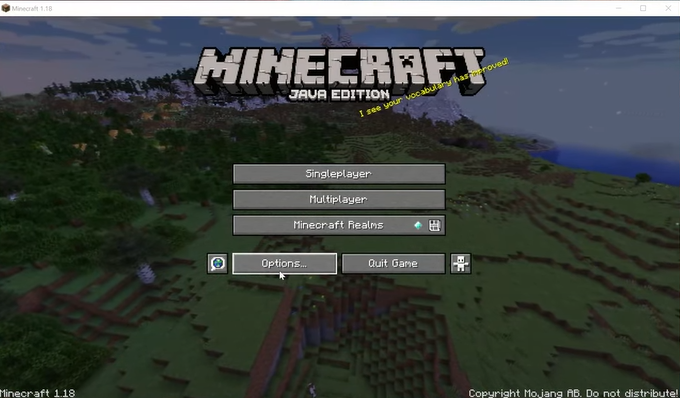
Next up, you’ll have to go ahead and open the game itself. When you launch the game, you’ll see that there are several options available in the game's main menu; you’ll have to click on the options button where you’re on the main menu and open it.

Once you’re in the Minecraft options menu, you’ll see a couple of options. You’ll see a resource packs button on the lower left-hand side of the main menu; you have to click on it!

Once you click on the resource packs button, you’ll be greeted with this screen; here, you’ll have to click on the available pack folder button to install the resource packs in Minecraft. When you do so, a folder will open up in which you’ll have to paste in the files of the resource packs.

Like we said earlier in this guide, drag and drop your resource packs on the desktop. So if you have them on your desktop or any place, simply paste them into the Minecraft Pack Folder that has opened up. You’ll have successfully installed resource packs in Minecraft. The same can be done for any resource pack in the game!
Once you paste them into the folder for the resource packs, close the window, and you’ll see the resource packs on the screen. Some players have issued this problem; most are cracked players, so don’t worry if you have a paid version. As for the cracked version players, don’t worry; simply restart the game, and the resource packs will be visible once again.

Now to install them onto your game, click on this arrow button as shown in the image above and click on done, and you’ll have installed the resource or texture pack to the game. To remove it, hover over it, and you'll see an arrow that will take it back to the not uninstalled side of the screen.
You can try a lot of different texture packs until you find your favorite one; we have suggested some great resource packs in the next section. Do check them out!
Popular resource packs
BetterVanillaBuilding
This simple texture pack doesn't stary away from the vanilla textures of the game too far, so you will still be familiar with almost every block you encounter in the game. It also features connected textures, which look really cool in organic builds, plus it also features a lot of cool and exciting textures that’ll surely make your gaming experience better!
Enhanced 3D
There is a slew of texture packs out there that try to add more depth to blocks in Minecraft, and nothing comes as close as Enhanced 3D comes to accomplishing it. The texture pack makes many blocks look way better by adding more depth to them, simply put, making them even more 3d!
Excalibur
Minecraft is a part steampunk [art medieval game if you really think about it. Most of the technology in the game is medieval, and there also is the element of magic to it, making it an ideal candidate for adding fantasy/medieval texture packs to it. There are a lot of great texture packs out there that give Minecraft that great RPG/Medieval feel, but nothing. Excalibur is just way better than anyone in this realm.
How to install mods
Mods in Minecraft are very tedious to install, especially if you're a beginner to technical stuff on your PC, but don’t worry. We will go you through this, and by the end of this, you’ll know how to install any mod that you get your hands on. But just like the resource packs, make sure you have the mod suitable for your version of the game!
Also, we will be downloading mods for Curse Forge in tis guide, as Curse Forge has the most significant community when it comes ot modding in Minecraft and also has the best mods that you can get your hands on. So first, before installing mods, you’ll have to install CurseForge in Your game.
Installing mods is the easy part after you’ve installed CurseForge, installing Curse Forge is the tedious part, as many players face a lot of different issues, so let’s take a look at how to install CurseForge and how to mitigate any errors that show up.
You can also use the Fabric, which is like a competitor to CurseForge and has different mods. But for simplicity's sake, we’re going with CurseForge in this one.
So now that you have a brief overview of what we're going to be doing let’s start with this tutorial!
Download Forge
To install CurseForge, you’ll simply have to go to this page where and download CurseForge for the Minecraft version that you have. Also, if you want to install mods for an older version of Minecraft, make sure to install the curseForge for the older Minecraft version that your mods are on. As for the players who want to install the latest version, download Forge for the latest Minecraft version.
Once you’ve downloaded the appropriate Forge version on your computer, move on to the next step!
Install Forge 200
Once you’ve download forge, you’ll have to install it, but before you install, make sure you have the latest version of Java running on your device. But how do you check this?

When you download curse forge, drag it onto the desktop; if you see the Java logo, a cup, you have the latest version of Java on your PC. So simply install the file using the Java option. But if you don’t get the Java option, it will be because you don't have the latest Java version on your game, so once again, simply go to this page, and download and install the newest version of Java.
Most of the time, players have an issue in this part of the tutorial as they can’t get around the fact that Forge isn't getting installed in the game. It is a major issue as you can’t install mods without Forge. But once again, as I mentioned before, if you have the latest version of Java running on your PC, you won’t encounter this problem; it is a fix for almost every type of error that might come up!

Once the latest Java version is on your PC, simply install Forge onto your PC.

Now open up the Minecraft launcher, and you’ll see a change there; in the lower-left corner of the launcher, you’ll see Curse Forge written. If this doesn't show up automatically, simply manually select it; it will be in the options there.
With forge setup, it’s time to move on to the next step, which is downloading and installing these mods in our game!
Download
Next up, you’ll have to download the mods you like to install in your game. Now just like I mentioned before, for the texture packs and for Forge, make sure you download mods that work with your Minecraft version; I can’t stress this enough, download only those mods that are for your version of the game!
Many a time, players will download any random version of the mod and then give up upon installing the mods as it doesn't work for them.
Also, take utmost care ot install mods from legitimate sites only; the last thing we want is you getting some kind of crypto-miner malware on your PC. You can install the mods form here.
Installing
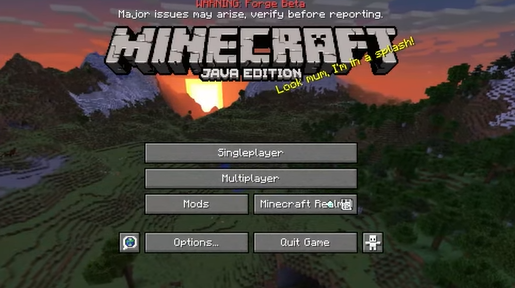
When you launch the game after installing Curse Forge, it will look something like this; as you can see, the Main Menu is a bit different than vanilla; a minecraft, and it also might’ve taken more time to open, don’t worry for most of us out there, after installing mod loaders the game takes time to open, so don’t panic.
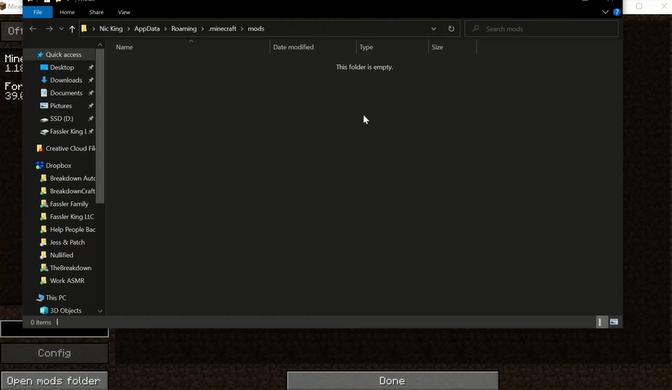
Click on the mods button that is visible in the lower left-hand corner of the screen, and you’ll and on this page where it’ll ask you to paste the mods in the folder. Now simply cut and paste the mods into this folder and relaunch the game, and you’ll see the mods.
And that’s how you install mods in your game!
Popular mods

Nullscape
Nullscape is a mod that’ll completely change the end dimension for you by adding a ton of new biomes and a lot of height to the end dimension. Right now, even though the end dimension is vast, it only stretches in the horizontal direction; there isn't a lot of variation in the Y-Axis.
This mod changes that, and oh man, the end just looks glorious with this one!

Alex’s mobs
Are you tired of seeing the same old sheep and cow and chicken and horse in vanilla Minecraft? Try Alex’s mobs which adds a ton of great animals ot the game, making it the ideal mod to add ambiance to the game. It also adds some hostile creatures that you'll be surprised to encounter in the wild. I won't spoil much; you should explore the world yourself to see how great this mod is!

Amplified Nether
If you think the nether looks incredible after the nether update and can’t be any better, think again, as the amplified nether mod does just that. It adds a lot of height to the nether, which surprisingly makes it 100 times better; I don’t understand why The devs just added this feature to vanilla Minecraft.
Apart from the increased height, the mod also adds a ton of new biomes, which I won’t spoil.